

Replace Discontinued RV Cabinet Latches: A How-To Guide
Table of Contents
- Why RV Cabinet Latches Break and How to Identify a Discontinued Part
- How to Measure RV Cabinet Latches for Accurate Replacement
- Understanding 3D Printed RV Replacement Parts and Their Advantages
- Verifying Compatibility Before Ordering a Replacement
- Step-by-Step Installation of Your New Cabinet Latch
- Common Installation Mistakes to Avoid
- Testing Your Replacement Latch for Safe Travel
- Frequently Asked Questions
Last Updated: October 9, 2026
Why RV Cabinet Latches Break and How to Identify a Discontinued Part
When you need to replace RV cabinet latches, understand that they endure constant stress from road bumps, engine vibration, and temperature swings. Over time they crack, wear down, or stop holding securely, letting cabinet doors swing open during travel and creating safety hazards. The frustration deepens when the manufacturer has discontinued your exact latch model.
Identifying whether your latch is truly discontinued is the first step. Check the manufacturer's parts catalog using your RV's year, make, and model. Many owners find the part listed as "no longer available" or "out of stock indefinitely", different from a temporary shortage, since a discontinued part is no longer produced at all.
Common failure points in cabinet latches
Cabinet latches fail at predictable stress points. The most common is the catch mechanism where the latch engages the striker plate: repeated opening and closing wears the plastic or metal catch smooth, preventing a secure hold. Another weak point is the mounting area, where vibration loosens fasteners and overtightening cracks the mounting tabs.

Push-button latches fail when the button sticks or the spring loses tension, and the surrounding plastic can crack from UV exposure and temperature swings. Drawer latches wear similarly, especially in galley kitchens where frequent use accelerates degradation.
Checking if your latch is discontinued
Photograph your latch from multiple angles and note any manufacturer markings, part numbers, or model designations. Then search the RV manufacturer's website using your coach's year, make, and model number, looking for a parts diagram or exploded view showing the exact latch assembly.
If the catalog shows the latch as unavailable, contact customer service and ask whether it's discontinued or simply out of stock. Out-of-stock parts may return to inventory; discontinued parts will not.
Check online RV forums and owner communities, where owners of the same model often document discontinued parts and the alternatives they've found, including 3D printed replacements matching the original specifications.
How to Measure RV Cabinet Latches for Accurate Replacement
Accurate measurements are essential when sourcing a replacement latch, especially a 3D printed one. Incorrect dimensions mean it won't fit, mount properly, or function reliably during travel, so measure carefully before ordering.
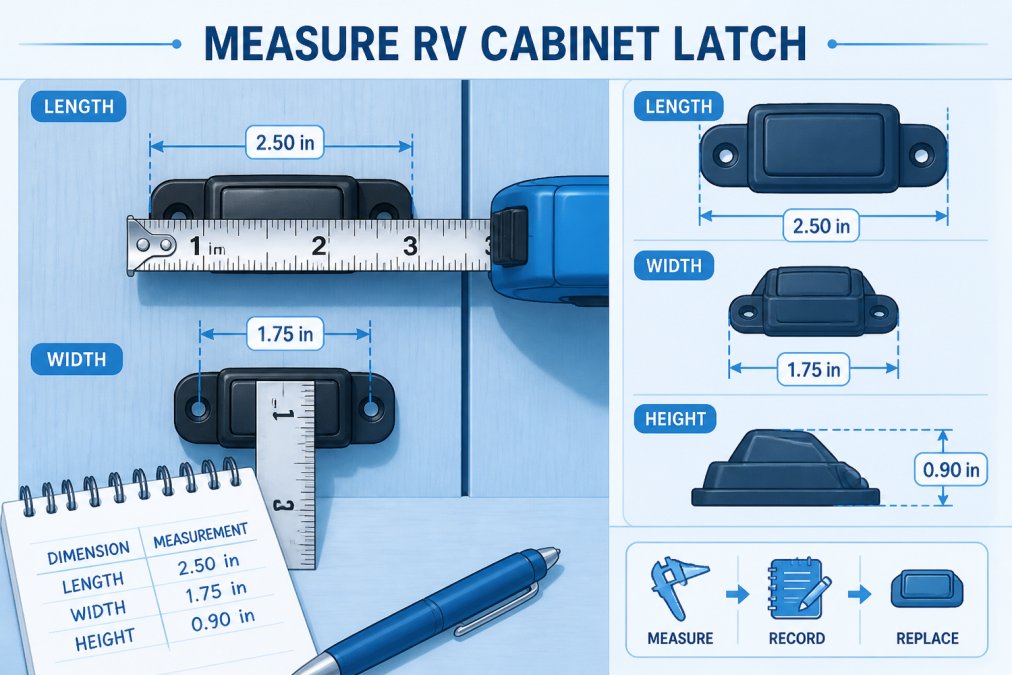
Taking accurate dimensions
Measure the latch body's overall length, width, and height with a ruler or caliper, recording inches to the nearest sixteenth. Measure any protruding catch or button separately, and photograph the latch from the front, side, and back for visual reference.
Pay special attention to the mounting flange thickness, which determines whether a replacement sits flush, and measure the latch cavity depth if the latch sits recessed. These details prevent costly ordering mistakes.
Recording mounting patterns and door thickness
The mounting pattern is critical. Measure the distance between screw holes with a ruler or calipers, record the hole diameter and whether holes are countersunk or straight, and photograph the mounting area for later reference.
Measure cabinet door thickness at the mounting point to the nearest eighth of an inch. RV doors vary by coach model and year, and a replacement latch must accommodate your specific thickness or it won't mount correctly.
Note the latch orientation: some mount vertically, others horizontally, and the striker plate or catch may face left or right depending on whether the door opens inward or outward. These details determine whether a replacement functions properly in your cabinet configuration.
Understanding 3D Printed RV Replacement Parts and Their Advantages
3D printing has transformed how RV owners solve the discontinued parts problem. Rather than accepting a part is gone forever, you can have a functional replacement manufactured to exact specifications, blending reliability with customization.
Why 3D printing solves the discontinued parts problem
3D printing eliminates the expensive injection molds and tooling that manufacturers require for small production runs. When a part is discontinued, the original molds are often destroyed or archived, and recreating them would cost tens of thousands of dollars, making a small rerun financially impossible. 3D printing bypasses this entirely.
A skilled 3D printing service can replace RV cabinet latches by creating a replacement from your measurements and photos: digital modeling based on your specifications, verification against the original latch, then printing, hand-finishing, and testing.
This approach works especially well for RV cabinet latches because they don't require the extreme precision of engine or structural components, they need to fit properly, mount securely, and hold doors closed during travel, all of which 3D printing delivers reliably.
Material options: ABS vs. PETG for cabinet latches
Two materials dominate 3D printing for functional parts like cabinet latches: ABS and PETG. Each offers different advantages depending on your priorities and use case.
ABS plastic provides excellent rigidity and impact resistance, withstands temperature variations from freezing winters to hot summers, and accepts hand-finishing well for smooth surfaces and refined details.
PETG offers superior flexibility and toughness, resisting cracking under stress better than ABS, which makes it ideal for parts that experience vibration or movement. It handles temperature swings and UV degradation well, though it's slightly harder to hand-finish.
For cabinet latches, ABS is typically the better choice because it matches original latch properties and finishes to a premium appearance. If your RV sees extreme vibration or you want maximum durability, PETG adds insurance against future failure.
Verifying Compatibility Before Ordering a Replacement
Ordering a replacement latch without verifying compatibility wastes time and money. A few verification steps prevent costly mistakes.
Matching by RV make, model, and year
Your RV's year, make, and model determine which latches fit your cabinet doors and drawers. Manufacturers used different designs, and even the same manufacturer changed designs between model years.
When contacting a 3D printing service, provide your complete RV specifications: year, make, model, and the specific cabinet or drawer where the latch is located. Some RVs used different latches in different areas, your bedroom cabinet might differ from your galley.
Ask whether the replacement has been successfully installed on your exact model. Services working with multiple RV owners accumulate real-world data and can say whether a replacement works reliably on your coach or needs modifications.
Checking mounting holes and alignment
Before ordering, verify the mounting hole pattern matches your cabinet door. Send clear photos of your original latch mounted in place, showing hole positions and spacing, so the service can compare them against the replacement design and confirm alignment.
Measure the distance from the mounting holes to the catch or button mechanism. If the catch is positioned incorrectly, the striker plate won't engage and the door won't stay closed during travel.
RV Screen Door Latch, Striker, and Knob Set (Post 2008) →
Confirm door thickness compatibility by providing your measurement and checking that the replacement mounting hardware accommodates it. Some latches use screws, others clips or snap-fit mechanisms, so ensure the mounting method suits your cabinet construction.
Step-by-Step Installation of Your New Cabinet Latch
Installing a replacement latch is straightforward with proper procedures. Take your time, use the right tools, and test thoroughly before hitting the road.
Removing the old latch safely
Gather the necessary tools: a screwdriver matching your latch screws, a small wrench or socket if it uses bolts, and a flashlight. Open the cabinet door fully and locate all fasteners holding the latch.
Carefully remove each screw or bolt into a small container so they don't get lost, noting their positions. If the latch is stuck from age or corrosion, apply penetrating oil and wait a few minutes before removal.
Once fasteners are removed, gently pull the latch away; if it resists, check for remaining fasteners or adhesive. Clean the mounting area thoroughly of old adhesive, corrosion, and debris so the replacement mounts properly.
Aligning and securing the new latch
Position the replacement latch against the door, aligning its mounting holes with the existing ones. If the pattern differs slightly, you may need to drill new holes or use shims for proper alignment.
Insert the fasteners and hand-tighten each first, checking that the latch sits properly and the catch or button faces the correct direction. Only after confirming alignment should you fully tighten.
Tighten gradually, alternating between holes for even pressure, and avoid over-tightening, which can crack plastic latches or strip threads. The latch should be snug but not forced, with the door sitting flush against the frame.
Testing retention and adjusting tension
With the latch installed, open and close the door several times, ensuring it engages smoothly and stays firmly closed without rattling or shifting. If it feels loose, check that all fasteners are tightened.
Test the catch by pulling firmly on the door; it should resist and hold securely. If it feels weak or opens too easily, the tension may need adjustment, some latches have adjustable mechanisms, so consult the manufacturer's instructions.
Verify the striker plate aligns properly with the latch. If the door is slightly misaligned, the latch may not engage fully; loosen the striker fasteners slightly, adjust the position, and retighten.
Common Installation Mistakes to Avoid
Many RV owners encounter preventable problems during latch installation. Learning from these common mistakes saves time and frustration.
The most frequent error is over-tightening fasteners; plastic latches crack easily under excessive torque. Tighten firmly but gently by hand rather than with power tools.
Another common mistake is skipping hole alignment checks before final installation.
Some owners install the latch in the wrong orientation; backwards or upside-down, it won't function. Compare the replacement against photos of the original to confirm orientation before final tightening.
Neglecting to clean the mounting surface causes problems: dirt, corrosion, or old adhesive prevents the latch from seating properly, leaving it at an angle that blocks engagement with the striker plate.
Testing Your Replacement Latch for Safe Travel
Before taking your RV on the road, test the replacement latch under conditions that simulate travel stress. This prevents cabinet doors from flying open while driving.
Close the door firmly and engage the latch, then grasp the edge and pull with moderate force; the latch should resist firmly.
Open and close the door at least twenty times.
If your RV has multiple replacement latches, test each individually for consistent performance. If one feels different from the others, investigate before traveling.
Take a short test drive on local roads with some bumps and turns, listening for cabinet doors opening or contents shifting.
For comprehensive replacement solutions, Socal3Dprintsdesigns offers products like the RV Screen Door Latch, Striker, and Knob Set and the Tiffin Newmar RV Screen Door Latch and Striker Plate Combo.

Discontinued RV interior cabinet latches don't have to leave you stranded.
Frequently Asked Questions
How do I know if my RV cabinet latch is truly discontinued?
Contact your RV manufacturer's parts department directly with your coach's year, make, and model. If they confirm the part is no longer available through official channels, check online RV forums and parts retailers to confirm. Many latches from older models (pre-2007 Tiffin and Newmar coaches, for example) are genuinely discontinued. Once confirmed, 3D printed RV replacement parts offer a viable solution that matches your original specifications.
What's the best way to measure an RV cabinet latch for replacement?
Use a digital caliper or ruler to measure length, width, and height of the latch body. Record the mounting hole spacing and diameter, and measure your cabinet door thickness. Document the color and finish of your original latch. Take photos from multiple angles. If ordering a custom replacement, provide these measurements along with your RV's year, make, and model to ensure the new latch fits exactly.
Will a 3D printed cabinet latch be as durable as the original?
Modern 3D printed latches in ABS or PETG materials are engineered for functional durability. The key is matching material specifications to your original part and ensuring proper installation. Avoid over-tightening mounting screws, which is a common cause of failure in both original and replacement latches.
Can 3D printing replace other discontinued RV cabinet hardware?
Yes. Beyond latches, 3D printing can replicate drawer catches, push-button mechanisms, striker plates, and door knobs for RVs and travel trailers. The process is the same: measure the original part, document your coach's specifications, and order a custom-fit replacement. This approach works for vintage interiors and models where manufacturers no longer stock parts, making it ideal for restoring older RVs to original specifications.